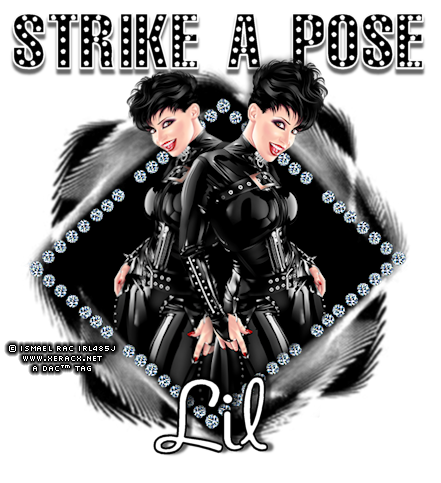

This is a Signature Tag tutorial created in Corel Paint Shop Pro Photo XI.
I hope you enjoy this tutorial.
Please send me your finished tag. I would love to see your results!!
Contact me via the link at the bottom of this page.
What's needed:
An Intermediate knowledge of PSP;
Corel PSP - Get a Free Trial.:Here:.
No Plugins Needed
I used the art of © Ismael Rac you will have to purchase a license for this tube at his site.
![]()
Supplies : File size: 146.24kb
Open a blank canvas 500x500px and flood fill white. Layers/New raster layer, flood fill black.
Layers/load mask from disk (or New mask layer if you have the mask open on your work space)
Apply Mask9.jpg with these settings: Source luminance checked, Fit to Canvas checked, Invert Transparency un-checked, Show all mask checked.
Layers/merge/merge group. Image/Resize/85%, All layers - un-checked. Adjust/Softness/Soften.
Open 'Blue Diamond' tube. Edit/copy and close tube. Edit/paste as new layer. Place inside of mask like I have in my tag.
Adjust/Hue and Saturation/Colorize with these settings: Hue 0, Saturation 0. Layers/merge/merge down.
Open your tube and resize if necessary.
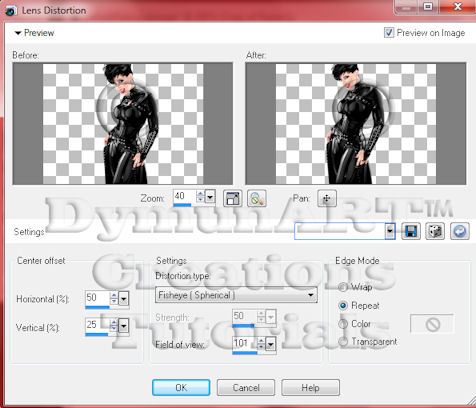
Layers/Duplicate (layer). Activate the first tube layer. Effects/Distortion/Lens Distortion (see diagram below for settings).

Move the tube to the top of the mask and slightly to the left (see my tag for example). Get the eraser tool and with the settings in the diagram below erase the left bottom corner of the tube to fit it inside the mask.

Now activate the 2nd tube layer. Move the tube to the center of the mask and down to the bottom(see my tag for example).
Use the eraser tool to round off the bottom of the dress to fit inside the mask. Close the bottom white layer.
Activate the first tube layer. Layers/merge/merge visible. Image/Resize/80%, All layers unchecked. Move the layer down a bit to make room for the text at the top of the tag.
Get the text tool; in the materials palette set the foreground to white and the background to black.
Font size 55px, Bold, Anti-alias - smooth, stroke width - 2.0. Type out and apply the text.
Effects/3D Effects/Drop Shadow with these settings: V 5, H 0, Opacity 60, Blur 3, Color black.
Layers/merge/merge down.
Add your name and copyright info. (You may use a different font here if you want.) Layers/merge/flatten all layers.
Adjust/Sharpness/Sharpen. Save as a .jpg/jpeg file, or you may save as a transparent png.
This tutorial is created and written by me. Any resemblance to another is totally coincidental and unintentional. This tutorial is to be used for non-commercial purposes only. You may share the link to this tutorial in PSP groups.
Strike A Pose Tutorial ©Lil Dymun/DymunArt™ Creations
Thanks for stopping by.
Hugz
Lil Dymun


3 comments:
Well hello there Miss Lil. I feel the priviledge of being the first to post here all over. Glad you are getting into tubing and I'm sure I'll need you sometime in the future.
Good luck with everything, and you're making me jealous. I've had a blog for a month now and haven't written anything. Guess I should get to writtin' huh?!...smile.
Hi Mizz Lil,
Your blog looks great. I have it bookmarked for tubes that I'll want and need. It's good to have another person doing quality AA tubes. Thanks.
You're such a talented lady. Keep letting that talent shine.
Love you much!
waving looks great -thank you for asking us by-now back to see more :)
Post a Comment