
This is an animated tag tutorial created in Corel Paint Shop Pro Photo X2 and Animation Shop 3. The animation can be done in EZ GIF Animator or Ulead GIF Animator 5 as well.
I hope you enjoy this tutorial.
Please send me your finished tag. I would love to see your results!!
Contact me via the link at the bottom of this page.
What's needed:A 'good' working knowledge of PSP;
Corel PSP - Get a Free Trial .:Here:.
Alien skin Eye Candy 5 Textures plugin - Get it .:Here:. and Ulead GIF-X 2.0 plugin Get it .:Here:.
(You will need these for the animation effects.)
Here are links for animation software:
Animation Shop 3
EZ Gif Animator
Font of Choice - I used Helinda Rook, you can get it .:Here:.
Filters Unlimited - Lens Flares plugin get it .:Here:.
wsl mask 254 - get it .:Here:.Supplies - .:Here:.
Tube of choice (it's best to have one that includes a closeup). I am using the gorgeous art of © Jessica Dougherty which may be licensed via Creative Design Outlet. The scraps/elements and wordart is created and copyrighted to me. You may
colorize these items to suit your tag. Please do not share my supplies with others or groups. Do not upload to file sharing sites or claim as your own. You may provide a link to his tutorial and a screen shot of this page.
Let's Get Started
(remember to 'save' often!)
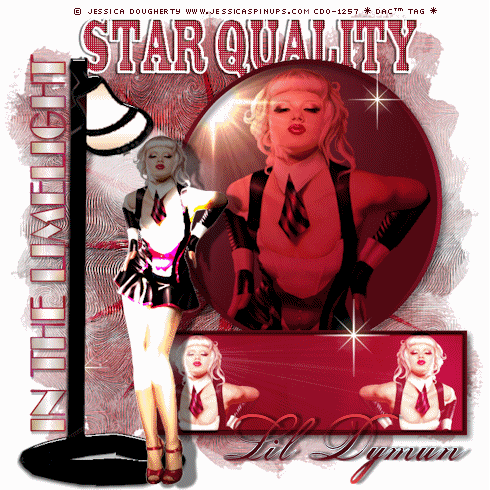
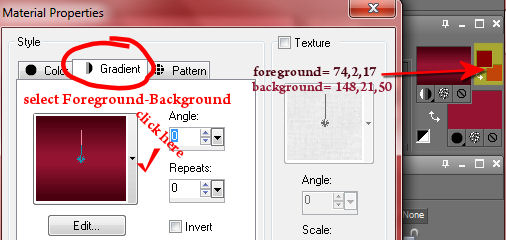
Open a 700x700 pixel blank image, flood fill with white. Open your closeup tube, choose 2 colors placing the lighter in the foreground and darker in the background of the materials palette. I chose 148,21,50 for my Foreground and 74,2,17 for my Background. Close the tube layer.
Open paper1 from the supplies, copy and paste as a new layer below your tube layer. Apply WSL mask 254 ( Source luminance, Invert transparency not checked), Merge layer down. Open the starburst tube from my supplies, copy and paste to canvas, change 'blend mode' to 'Overlay', merge layer down. Open the 'Star Quality' wordart and copy and paste to canvas and move to top center of tag back merge layer down. Open the 'disc' tube from my supplies and paste as a new layer and center below the word 'Quality'(see my tag for reference). Now click on disc layer; go to Selections, Select All, Float, Defloat, Apply Unlimited Filters 2.0 Lens Flares/Flare 07, default settings. Activate your closeup tube layer and make visible. place in center of disc, resize if necessary.
Invert Selection. Click on your tube and hit delete. Change 'blend mode ' to 'Overlay', merge layer down. Click on disc layer, Selections, Invert selection, Selection Borders, Inside, border width 3. Add a new raster layer above the disc layer Now in the materials palette, change the foreground to your dark color and put the light color in the background. Click on the 'Gradient' tab and select 'Foreground-Background'(see diagram).
Flood fill your new 'ring' layer with this gradient. Select 'none'. Add drop shadow 2,2,65,2,black. Merge layer down, add drop shadow 5,5,50.11,black. OK, now invert the materials palette putting your light color in the foreground and dark color in the background. Activate the 'preset shape' tool with 'rectangle' selected, line style - solid, width 7. Draw a rectangle approximately 450x150 pixels. Convert layer to raster. Move and center below disc
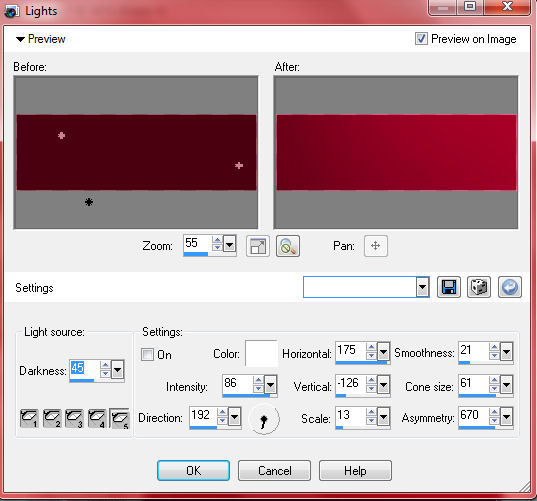
layer(see my tag for reference). With the 'magic wand' select inside the rectangle. Go to 'Effects/Illumination effects/ 'Lights' apply with settings in the diagram below.
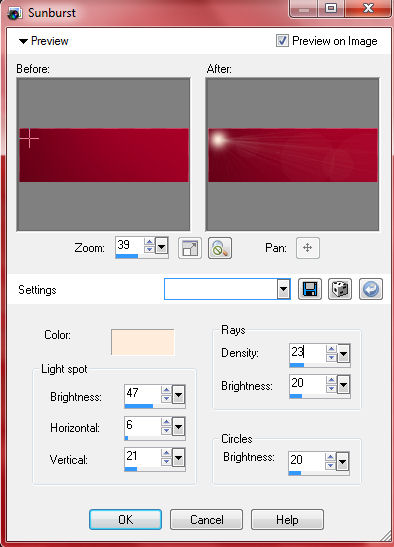
Now apply 'Sunburst' wih the settings in the disgram below.
Open your main tube copy and paste as a new layer and place a portion of your tube in the left corner of the rectangle. Here I chose the image that came with his tube. Invert selection and hit delete on the tube layer. Deselect. Duplicate this layer and mirror. Move to right side of rectangle. Merge the two layers and change the 'blend mode' to 'Screen', merge layer down. Selections, Select All, Float, Defloat, Selection borders, 'Inside' ticked, border width '7', Effects, Artistic Effects, apply 'Hot Wax Coating'. Deselect. Add the same drop shadow you put on the disc, 'merge visible'. Open the lamp tube from my supplies and copy and paste as a new layer. Move to the left side of the canvas (see my tag for refrence). Duplicate this layer twice and link together as in the diagram below.
Get the 'Magic wand' tool and select the white areas of the globe and the luminance. Adjust, Brightness and Contrast, Brightness and Contrast, 'brightness'=15; 'contrast'=15. On the second lamp layer change the brightness to 25, and 35 on the third lamp. Select "none'.
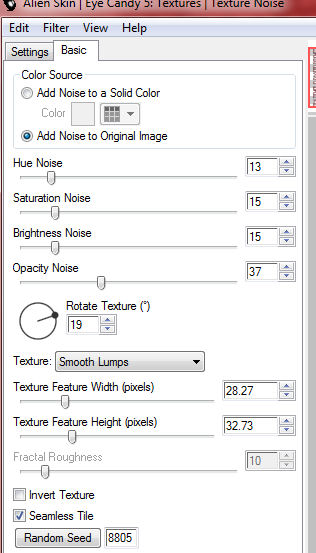
Copy and paste the wordart 'in The Limelight' from the supplies. Rotate this layer 90⁰ to the left. Place on side of lamp, (see my tag for reference). Duplicate this layer twice and lock the layers with the lamp set. Click on your first wordart layer, apply Alien Skin Eye Candy 5, Textures, Texture Noise with the settings in the diagram below.
Apply to layers 2 and 3 hitting the 'random seed' button each time. Now open your main tube and copy and paste at the top of your canvas. Duplicate twice. Lock these layers in a set of their own (set 2). Click on the second tube layer, apply plugin Ulead Effects GIF-x 2.0, click on the 'Light' tab, see diagram below for settings.
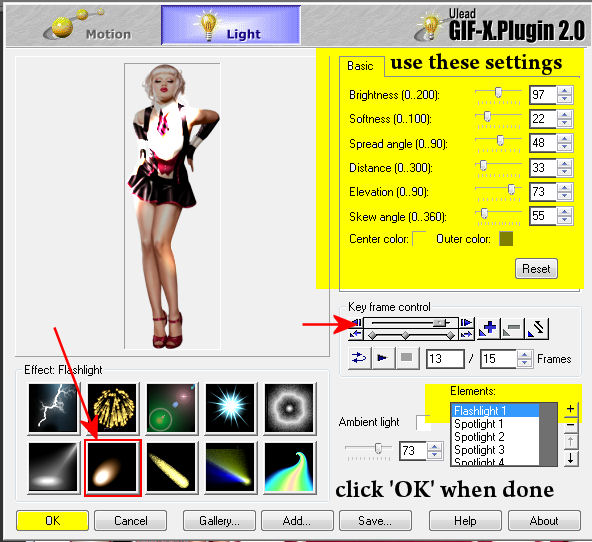
On the third tube adjust the 'Key Frame Control' slider to halfway. Add a drop shadow of choice to the tube layers. I used 5,20,50,4,black. Now go to "Image' Resize, 70%, all layers checked. Click on the bottom layer; add the copyright info and your watermark/license info.
Merge down. (I also added a few white star sparkles found in the tubes section inside PSP, this is optional.)
Let's Animate! Yea!
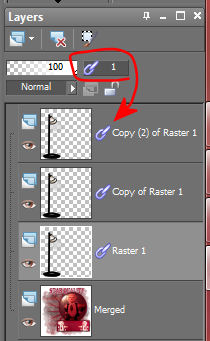
Duplicate the bottom layer twice. You should now have 4 sets of 3 layers for a total of 12 layers. Close all layers except the first layer of each set. Select the top layer, 'merge visible'. Now close this layer and click on the next layer and make it visible. Make the second layer of the remaining sets visible and 'merge visible'. Repeat with the last set, you now have 3 layers/frames.
Close off the 2nd and 3rd layer and click on the top layer keeping it visible. Now add your name. I used the font Helinda Rook at 100 px, Smooth, stroke 1, kern 0, foreground color 148,21,50 and background and ivory gradient (Gradient 40) in PSP. I added a drop shadow of 5,5,50,9,black. Keep the text layer active, Edit, 'copy merged'. Over to Animation Shop 3 ( or other animator), 'Paste as new animation'. Back to PSP, close off the first frame and make the 2nd frame visible, 'copy merged' and paste into AS 'after current frame'. Back to PSP, close off the 2nd frame and make visible the 3rd frame. 'Copy merged' and paste 'after current frame' in AS.
Edit, Select All. Animation, Frame prperties, set animation speed to 25 and save as .gif file. You're done!.

Paint Shop Pro Tag Tutorials and Scrap Kits, Signature tags and Email Graphics
Software and resource Sites


Saturday, August 27, 2011
Star Quality - PSP Tag Tutorial
Subscribe to:
Post Comments (Atom)
![]()
♦ ♦
♦ Back To The Top ♦
1 comment:
this is friggin' awesome !!
Post a Comment